Chapter 11: Report Format and Final Production
In this chapter, as with others in this course, you'll do several things as
once. First, you'll explore the components of a formal report (like the one
you'll be turning in toward the end of the semester) and see what their
required format and contents, and then you'll do an assignment in which you
use all these requirements to format the text of a report.
General Formatting Guidelines
Here are some general formatting guidelines that apply to the entire
report:
- Use 1- or 1-1/2-inch margins for all four margins of the report. You
might want to use a 1-1/2-inch margin at the top and 1-inch margins for the
left, right, and bottom.
- Use a 1-1/2-inch left margin if your binding uses a lot of space (for
example, brad-type binders that require 2- or 3-hole punch).
- Generally use doublespaced typing except in those areas where
singlespacing is shown (for example, in the transmittal letter, descriptive
abstract, figure titles, short vertical lists, and items in the
information-sources list).
- Use one side of the paper only.
Formal Reports-Component by Component
This section examines each component of the formal report and points out
the key requirements in terms of content, design, and format. Remember that
these are requirements, or "specifications." Much of the work
that professional technical writers do is governed by specifications. Just
as an electric component much be built according to certain design
specifications, so must most technical documents such as instructions
manuals, reference books, and so on. Your job, like any technical writer's,
is to stay as close to the specifications as you possibly can.
Covers and Label
Your final report should use some sort of cover and label. The best is the
plastic spiral binding that you can have done at most copy shops. It uses
only a quarter-inch of the left margin, and the bound report lies flat when
open. The least expensive binding is the type for which you punch holes in
the left margin and fix the pages in the folder with brads. Loose-leaf,
ring binders are generally too large and bulky-also the pages tear. Copy
shops offer other kinds of binding that work well also. However, avoid the
clear or colored plastic ones with the plastic sleeve that fits on the left
side-not only is it grade-schoolish, it's aggravating to use.
As for the label, the best option is to design your own and print it out on
an ordinary sheet of paper, then take it to the copy shop and have it
copied onto the cover of your choice. Adhesive labels are okay-but you have
to buy hundreds of them and then find a typewriter to type them.
Figure 11-1. Report cover with label (the label can
be photocopied onto the cover).
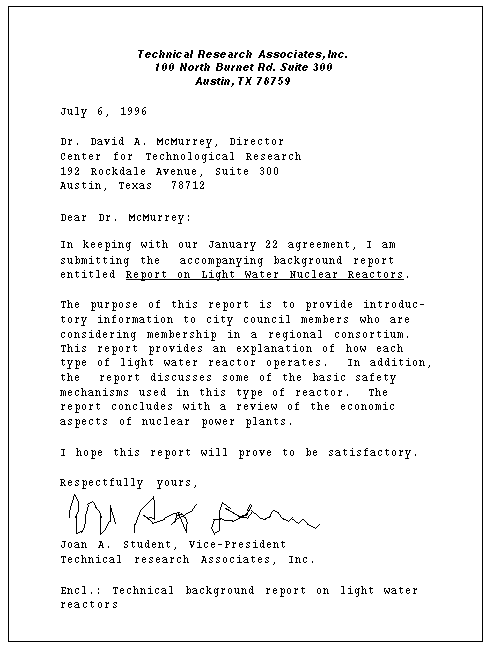
Transmittal letter
The transmittal letter basically says "here's that report we agreed
I'd write!" Notice that it mentions the contract date, briefly
discusses the purposes and main contents of the report, and then closes
with a polite suggestion to get in touch after the recipient has had time
to review the report. (Notice that the middle paragraph is very repetitious
of the descriptive abstract and the introduction-that's okay. Reports are
designed to accommodate multiple entry points by readers.)
Figure 11-2. Transmittal letter. It's not
"officially" a page inside the report; normally it's attached to
the outside of the front cover. But to help your instructor, make it the
first page inside the bound report. (A mouse tried to sign this letter.)
Title page and descriptive abstract
At the bottom of the title page is the descriptive abstract. See the
section on descriptive abstracts for further details.
Figure 11-3. Title page and descriptive
abstract. This is the first "official" page in the report. No
page number is displayed on this page (but it is "i").
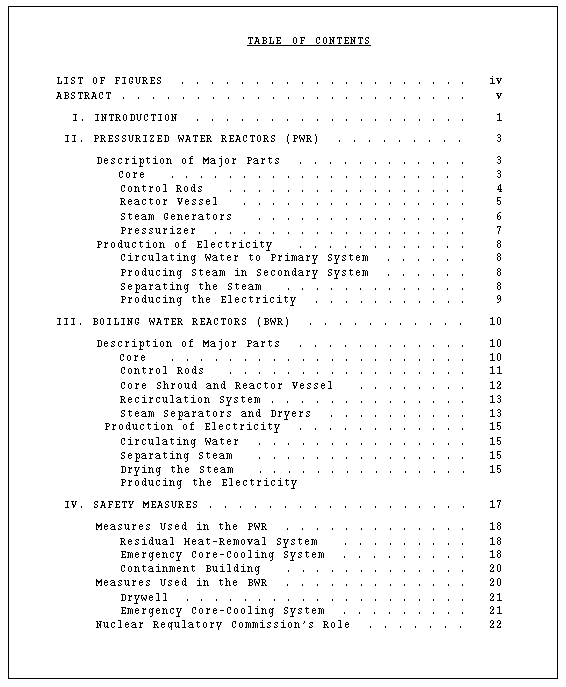
Table of contents
The table of contents (TOC) lists the headings from the body of the report
and the page numbers on which they occur. It is not required to list
all headings. This TOC could have excluded all third-level headings
and fit on one page.
Figure 11-4. Table of contents. Notice the use of
initial caps and all caps as well as the use of right alignment on the
Arabic and Roman numerals. No page number is displayed on this page (but it
is "ii").
Figure 11-4--continued. Second page of the table
of contents. Notice the format if you have more than one section in the
appendix.
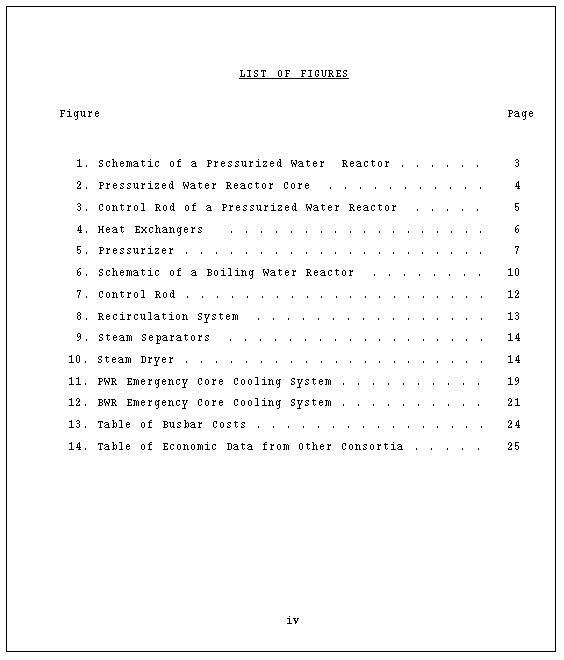
List of Figures
In the list of figures, you list all of the titles for figures and tables
in your report. If any title is too long, trim it to a meaningful
portion. In this example, notice that instead of having a separate list of
tables, the tables (Figures 13 and 14) are included here.
Figure 11-5. List of figures page. Notice that
the page number would be "iii" if the table of contents had been
only one page long.
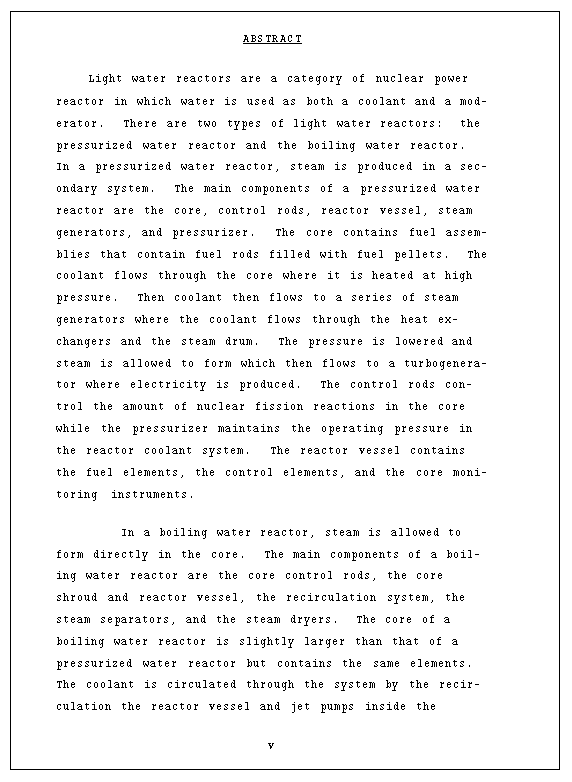
Abstract (informative)
See the section on informative abstract
for details.
Figure 11-6. Informative abstract (first
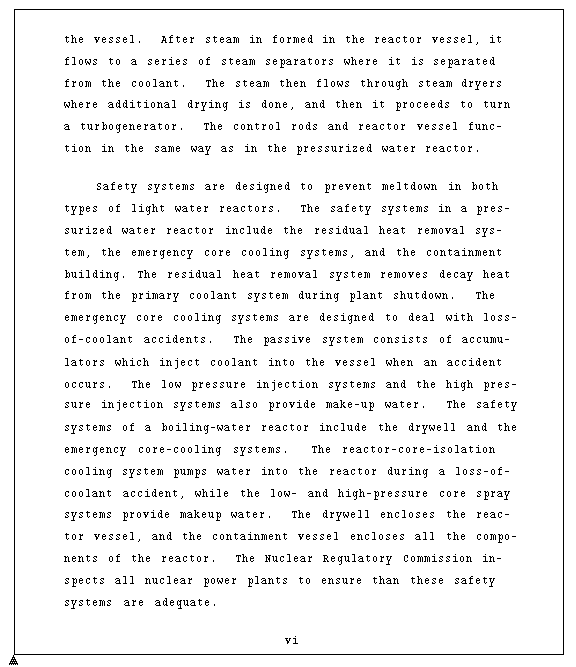
page).
Figure 11-6--continued. Second page of
the informative abstract
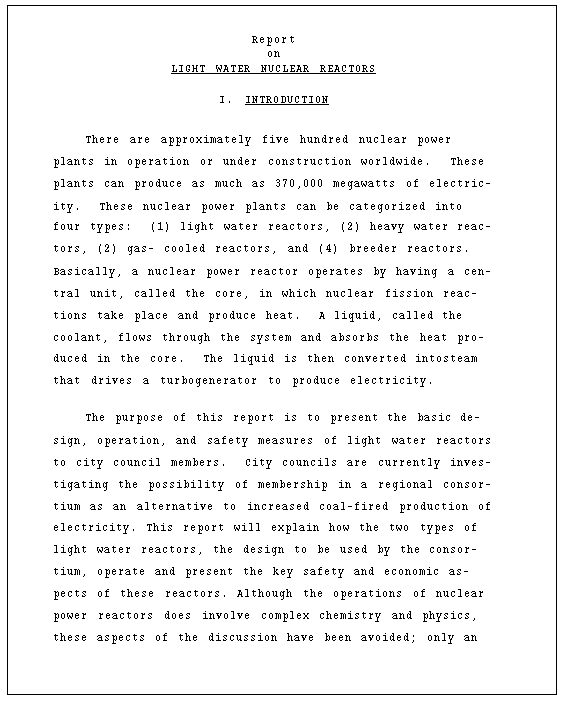
Body of the report--introduction
See the discussion on introductions for details.
Figure 11-7. First page of the body of the
report--the introduction. Notice that the title of the report is set at
the top, just above the first-level heading and that no page number is
displayed (although it is Arabic "1").
Figure 11-7--continued. Second page of the
introduction. Notice that the next section (section II) does not start
directly below the end of this introduction. The next section starts with a
first-level heading (Roman numeral "II") and therefore starts a new
page.
Page with headings and graphics
In the body of your report, be
sure to use the standard format for headings (as described in Chapter 4), for lists (as described in Chapter 5), and for graphics (as described in Chapter 7). If you are writing instructions,
don't forget to use the standard format for special notices as
described in Chapter 6.
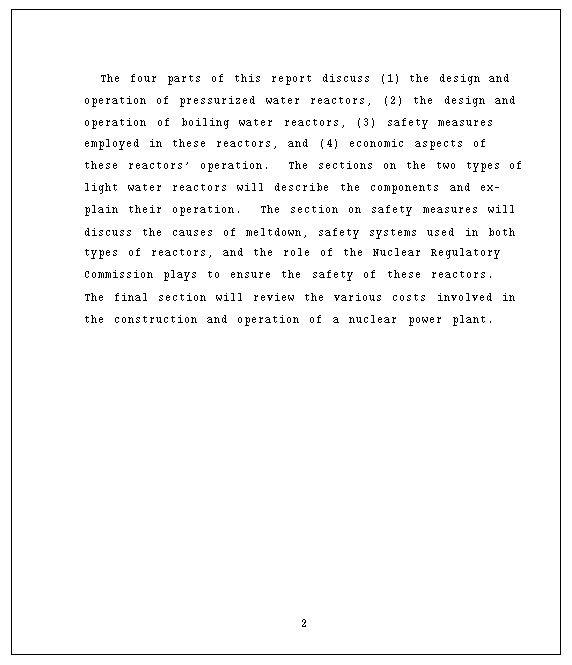
II. PRESSURIZED WATER REACTORS
This section of the report describes the key
components of the pressurized light water reactor and
explains their operation in the production of
electricity.
Description of the Major Parts
In a pressurized water reactor (see Figure 1),
the reactor cooling water entering the core is highly
pressurized so that it remains below the boiling point.
The water leaves the reactor to pass through steam
generators where a secondary coolant is allowed to boil
and produce steam to drive the turbine.
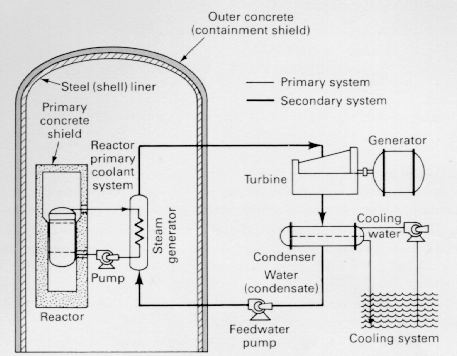
Figure 1. Schematic of a Pressurized Water
Reactor. Source: Nero, Anthony V. A Guidebook
to Nuclear Reactors, p. 78.
The key components in this process are the core, the
control rods, the reactor vessel, the steam generators,
and the pressurizer.
Core. The core is the active portion of the reactor
providing heat to the system. The core contains fuel
assemblies that contain fuel rods filled with fuel
pellets.
Fuel. The fuel in the pressurized water reactor
consists of cylindrical pellets of slightly enriched
uranium dioxide with a diameter of 0.325 in by 0.39 in.
The pellets are dished at the ends to allow for thermal
expansion [12:2004].
3
Figure 11-8. Page from the body of the report. First- and second-level
headings are used, along with a graphic and figure title. (This one uses
the long form of citing the source. Directions for a shorter form
can be found in Chapter 7.)
Appendixes
The appendix is a good place to put information that just will not fit in
the main body of the report, but still needs to be in the report. For
example, big tables of data, large maps, forms used in an organization, or
background discussion-these are good candidates for the appendix. Notice
that each one is given a letter (A, B, C, and so on).
Figure 11-9. The appendix divider page. Call it
"Appendix" if there is only one appendix (for example, the list
of information sources); call it "Appendixes" if there is more
than one appendix. (No page number is shown, but it would be
"32").
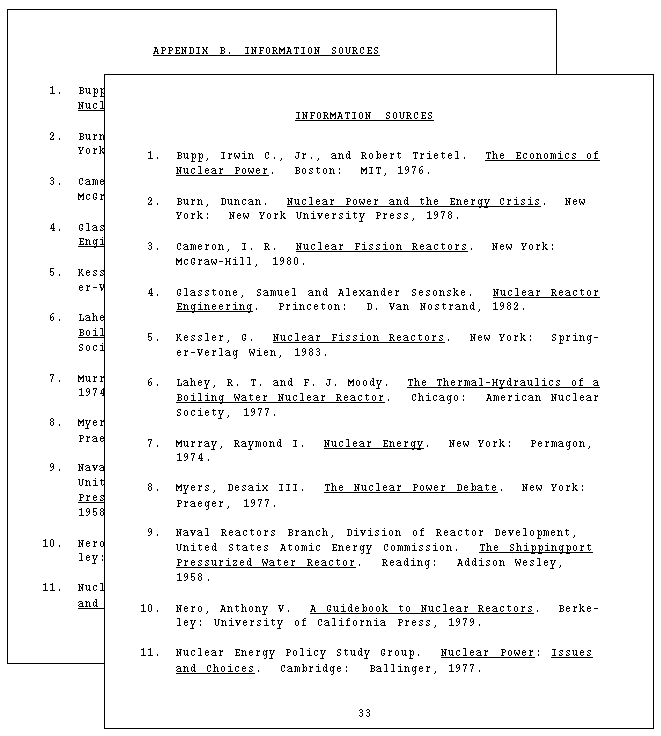
Information sources
Remember to put all information sources in this list, including
nonprinted, nonpublished ones. For style and format of these entries, see
the section on documentation.
Figure 11-10. List of information sources. If
this list is the only appendix, omit the "APPENDIX B." part and
just have "INFORMATION SOURCES."
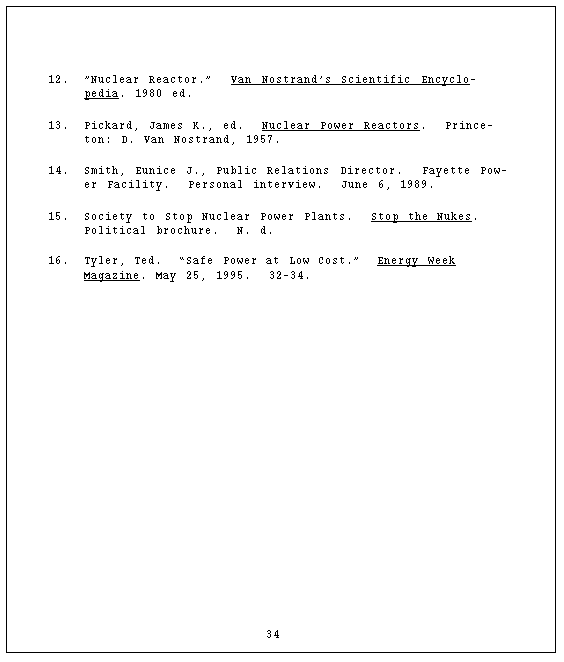
Figure 11-10--continued. Second page of the
information-sources list. Remember that titles of books, encyclopedias, and
magazines are underlined (or in italics) and titles of magazine or
encyclopedia articles are in double quotation marks.
Page-numbering style
Page numbering in technical reports may seem a little peculiar. However, it
is pretty much the same style used generally in traditional publishing. Go
back through the example pages in this chapter and check whether a page
number is shown and what style is used.
- All pages within the front and back covers are numbered (except for the
transmittal letter); but the page number is not always displayed.
- All pages coming before page 1 of the introduction use lowercase Roman
numerals.
- All pages beginning with page 1 of the introduction use with Arabic
numerals.
- Page numbers are not displayed on the transmittal letter, title page,
first page of the table of contents, page 1 of the introduction, and the
appendix divider page.
- There are several choices of pagination style for the main-text
pages:
- Center page numbers at the bottom (halfway between the last text line
and the bottom edge of the paper).
- Place page numbers in the top right corner (on the right margin,
halfway between the top text line and the top edge of the paper). Do not
display page numbers on any page with a centered (first-level) heading
(display it centered at the bottom).
- Some word-processing software causes problems in implementing these
pagination guidelines; let your instructor know.
Final Production
The following discussion focuses on what you should do to get your final
report ready to hand in. You don't need to format your pasteup/format
assignment like this, however. Also, these guidelines need not be followed
for the preliminary draft of your final report.
Once you have your final draft as polished as you can get it, you are ready
to "package" it for final production. Here are the steps:
- Make a good printout (or final typing) of your report, on good paper,
using fresh print supplier (ribbon, toner, cartridge, whatever you printer
or typewriter uses). Remember to design and type or print your cover label
(just type or print it out on a clean white sheet of paper).
- Make sure your graphics are good quality. If they are, tape them down
onto the pages. Make sure they fit neatly within the margins-top and
bottom, left and right. (See the section on graphics
for more on creating graphics and incorporating them into your reports.)
- Make sure all the components (discussed in the first part of this
chapter) are in place and everything looks okay.
- Head for a good copy shop-there, get a good photocopy of your text
pages. Check to see how the pages with taped-in graphics look. If they are
not right, ask a copy-shop person for help.
- Now select the cover and have the label you design printed on it. Most
shops have numerous colors and thicknesses of covers to choose from. (Spare
us the leatherette look with the fake gold-embossed trim-make it plain,
simple, honest!)
- Finally, get the report with its cover bound. The plastic spiral
binding works great. There are other bindings that work nicely
too. Remember, though-no clear plastic cover with those plastic sleeves on
the left side!)
You can have your final copy back-just call your instructor after the
semester is over or hand the report in with a self-addressed, stamped
envelope that can hold it.
Take special pride in this part of the project! If you've not produced a
report this way before, you'll probably be very pleased and impressed with
the results (I'll be out there somewhere muttering, "See-I told you
this would all be worth it...")
Return to the table of contents for the TCM1603 Course Guide
(the online textbook for Austin Community College's online
technical writing course).
This information is owned and maintained by David A. McMurrey. For
information on use, customization, or copies, e-mail
davidm@austin.cc.tx.us or call (512) 476-4949.